First steps
Unpack the system, plug it in and set it up with the wizard
This guide walks you step by step through the complete initial setup of your HydroCommander — from unboxing to the first test run. Allow about 30–45 minutes.
You will need: a filled water tank, scissors (to cut the hose to length) and a collecting basin plus a measuring cup (pump calibration). Optional: a smartphone with the HydroCommander app and your Wi-Fi password. No other tools required.
1Unbox and check the contents
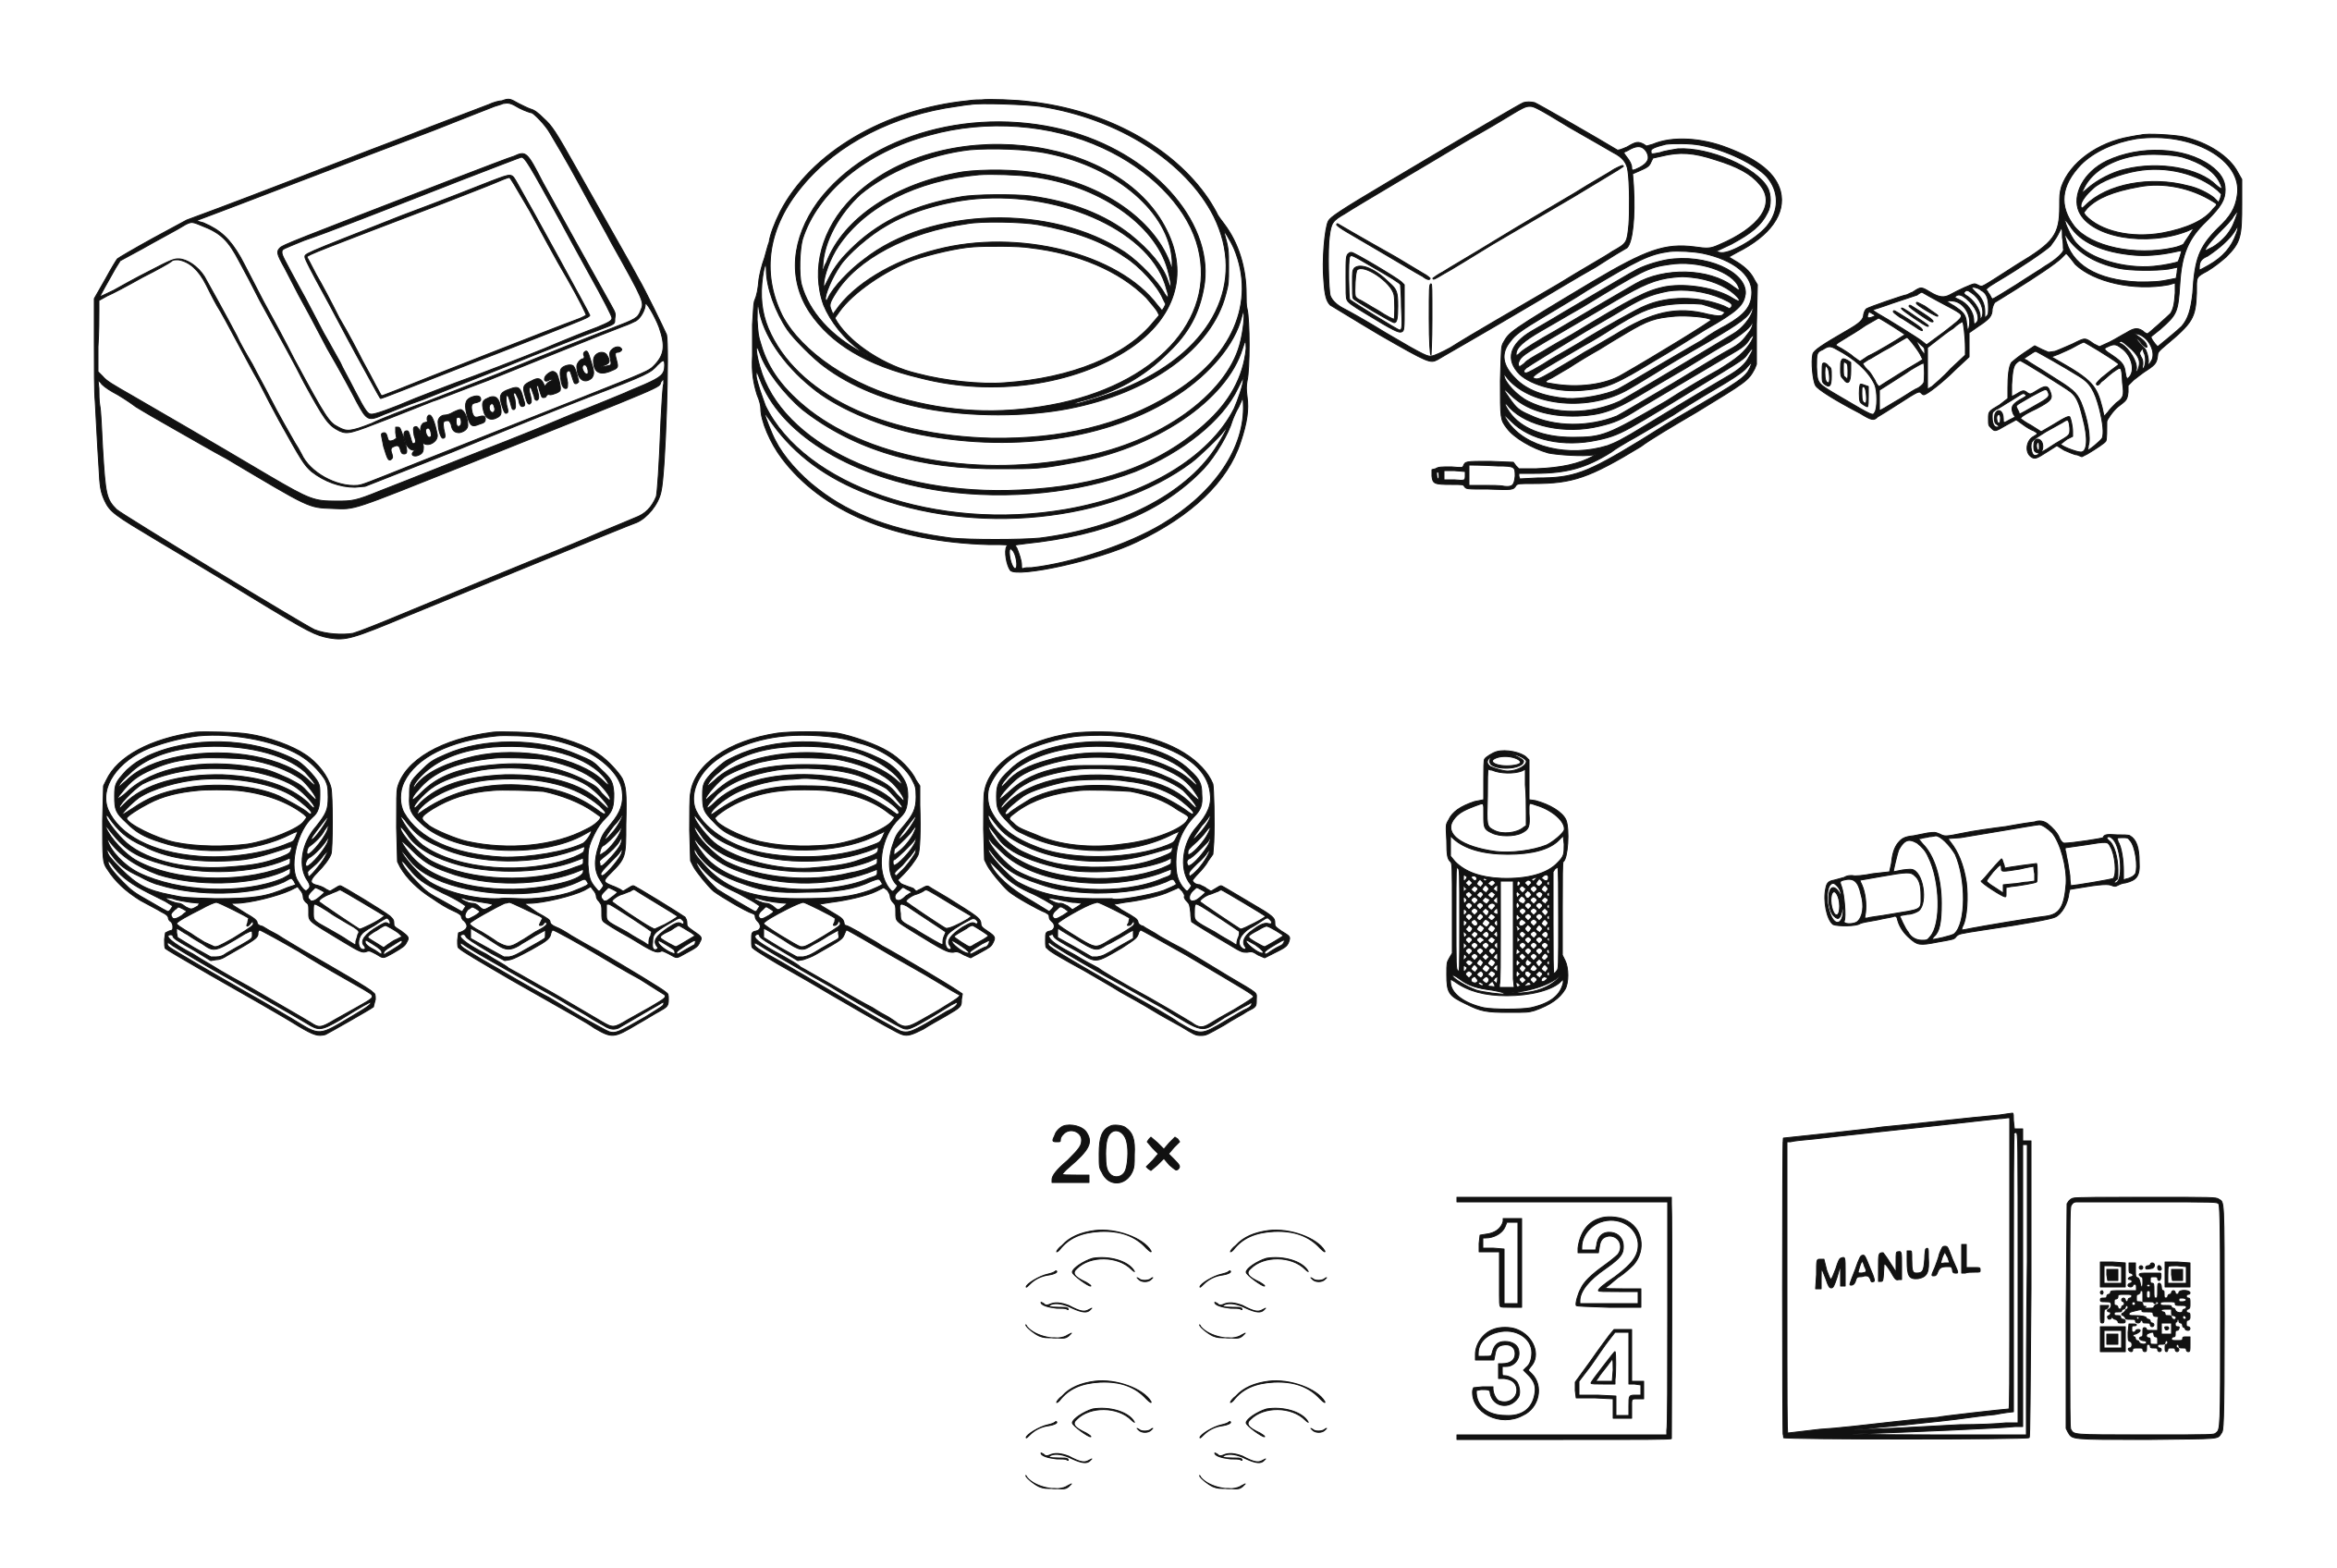
In the box: unit, power supply, sensors, hose, filter, check valve Open the packaging and take out all components. Always included: HydroCommander main unit, power supply, 10 m of hose, 4 moisture sensors, suction filter, check valve, clips for bundling hose and cable, sticker set with zone numbers, user manual and quick-start card with QR code.
2Check the watering accessories
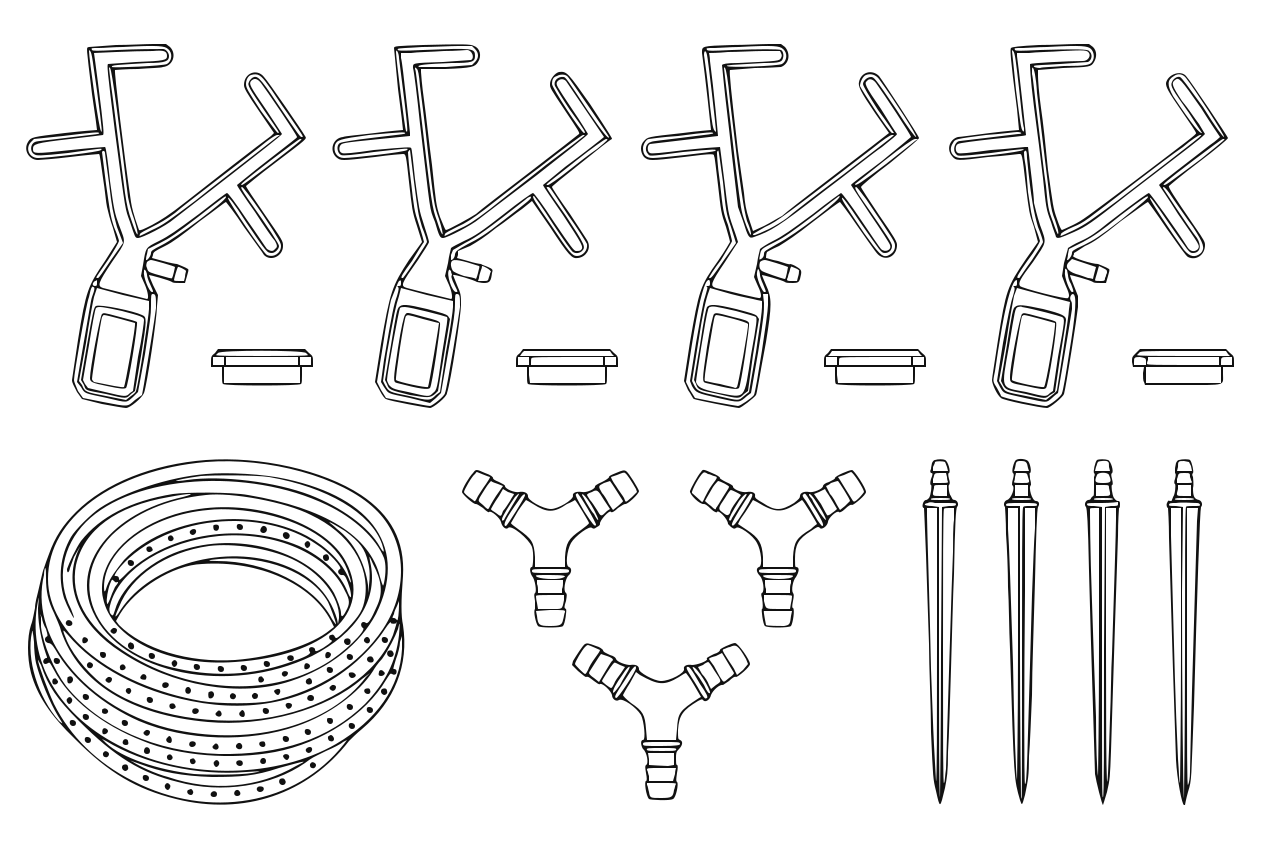
Watering accessories, depending on your order Then there is the equipment that gets the water to the plant. Four water distributors are always included — that equips each of the four zones for a single plant.
Depending on the accessories you ordered, individual zones may come with different parts: Y-splitter (several plants on one zone) or drip hose (bed).
Tip
Think now about which plant will become which zone — that determines which accessory goes on which hose.
3Position the HydroCommander
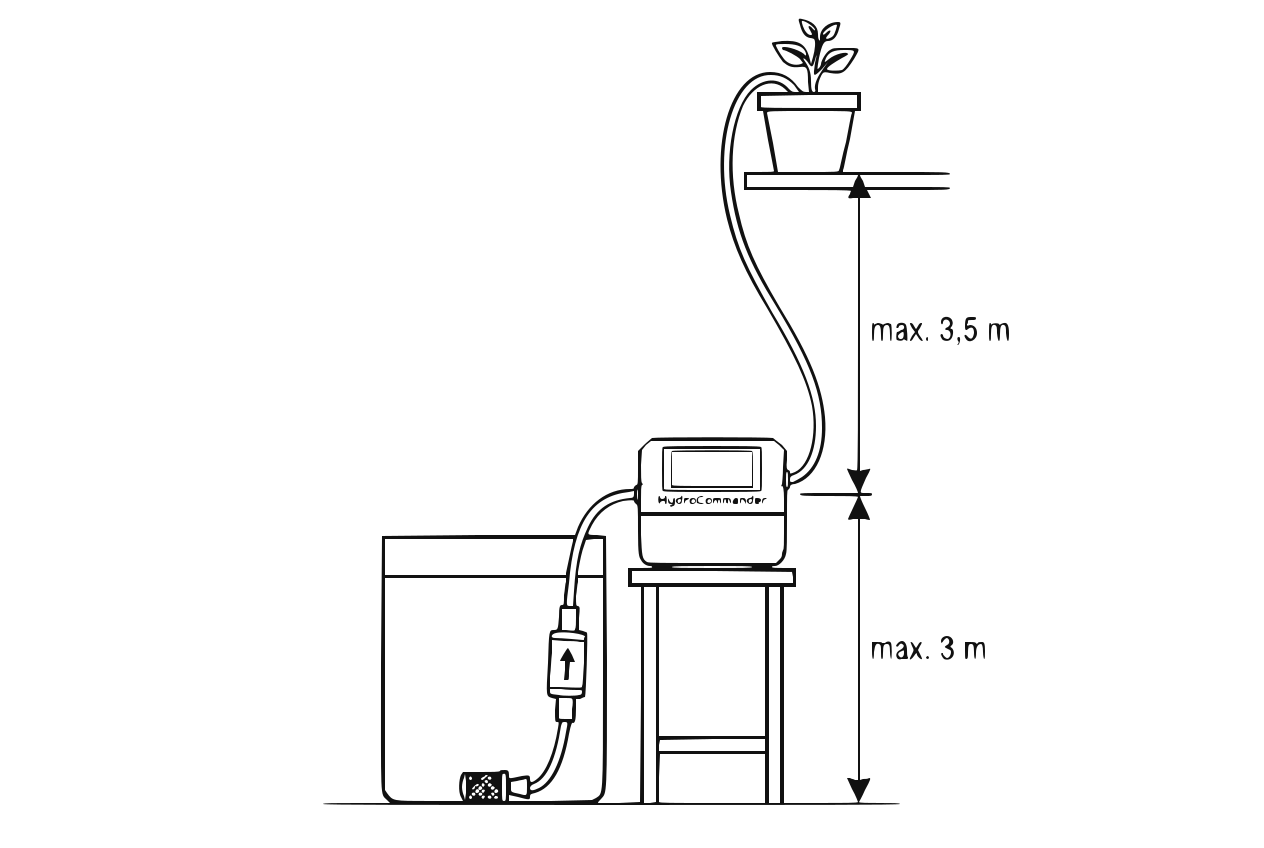
Suction lift up to 3 m from the tank bottom, delivery height up to 3.5 m from the device to the plant Place the HydroCommander in a suitable spot — ideally right on top of the water tank, and in any case higher than its full water level. Otherwise the tank drains through the device even without the pump running. For the same reason, water distributors and drip hose never lie lower than the full water level. A power outlet must be within reach: the device needs power all the time, and the power supply cable only reaches so far. Two pump height limits matter:
- Suction: the maximum suction lift is 3 m — measured from the tank bottom to the device, so it still holds with a nearly empty tank.
- Delivery: max 3.5 m between device and plant — so plants may also sit elevated (shelf, windowsill).
Caution
Close to these limits the flow rate drops noticeably — calibrate the pumps after setup and the amounts still come out right. Well beyond them the pump stops delivering entirely.
4Assemble the suction hose and connect it to the device
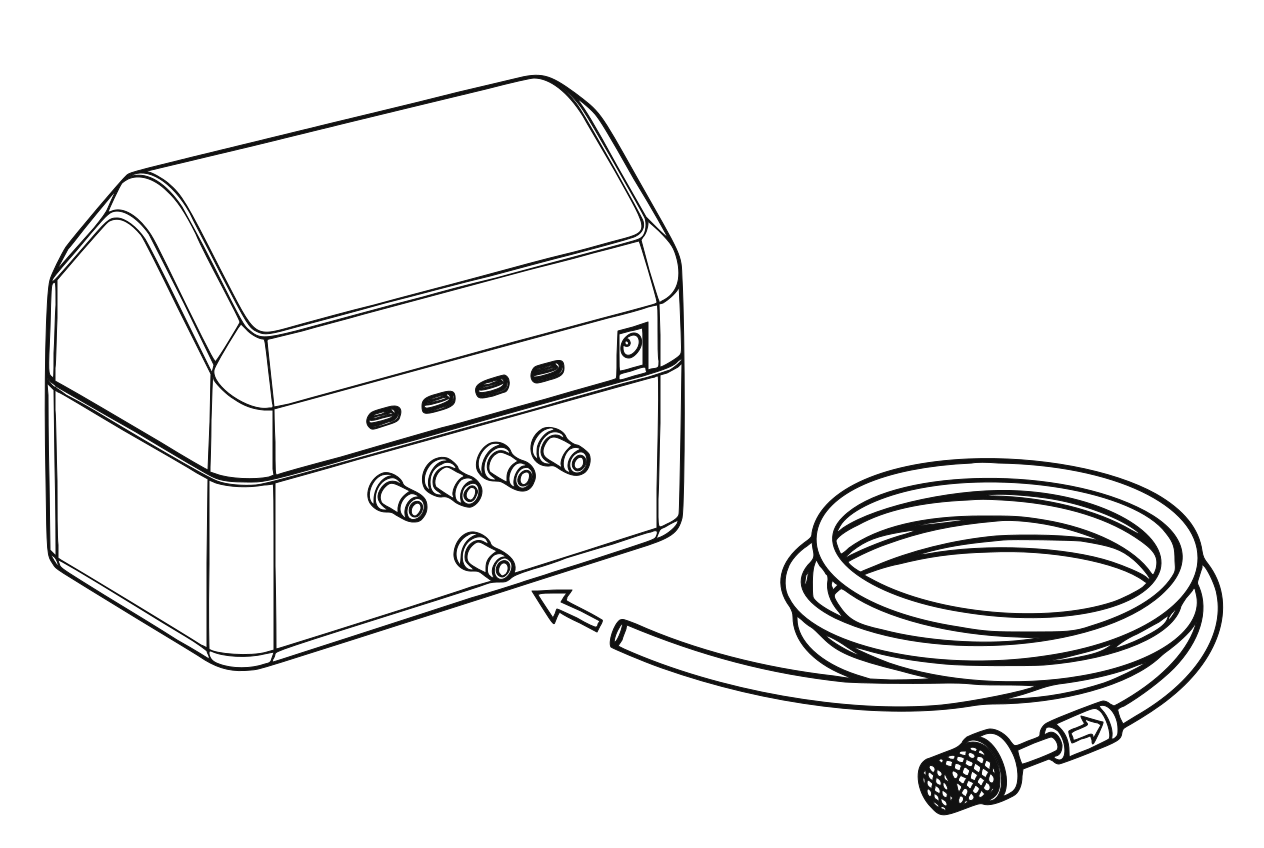
Suction hose at the device: filter, check valve (arrow toward the device), hose The suction hose is assembled in three push-fit steps:
- Cut a short piece of hose (2–3 cm) and push it onto the suction filter.
- Push the check valve on — mind the direction: the arrow points away from the filter, toward the device.
- Attach the remaining suction hose at the length you need.
Then connect the free end to the suction inlet on the device — the single inlet; the four numbered connectors next to it are outlets.
5Place the suction hose in the tank
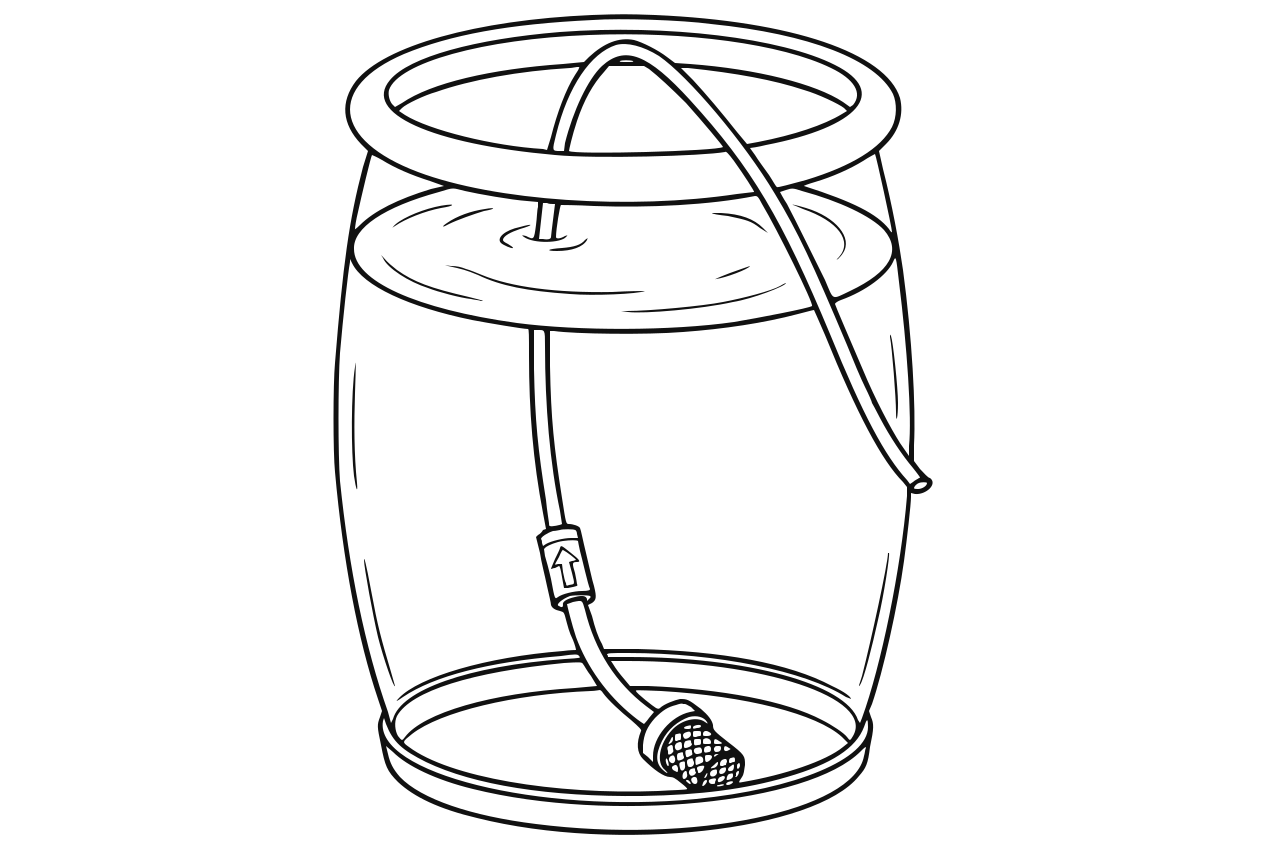
Suction hose in the tank, filter first Lay the finished suction hose into the water tank, filter first, so that the filter comes to rest on the bottom.
Tip
The suction hose should be the lowest point of the system — that way it stays filled with water and the pump delivers immediately without drawing air. The filter often floats at first: there is air inside it, and that air does not escape by itself. Push it under water and shake it gently until no more bubbles rise. If it stays stubborn, briefly suck on the end of the hose until water follows — after that it sinks and the pump delivers from the very first moment.
6Assign zones and cut the hose
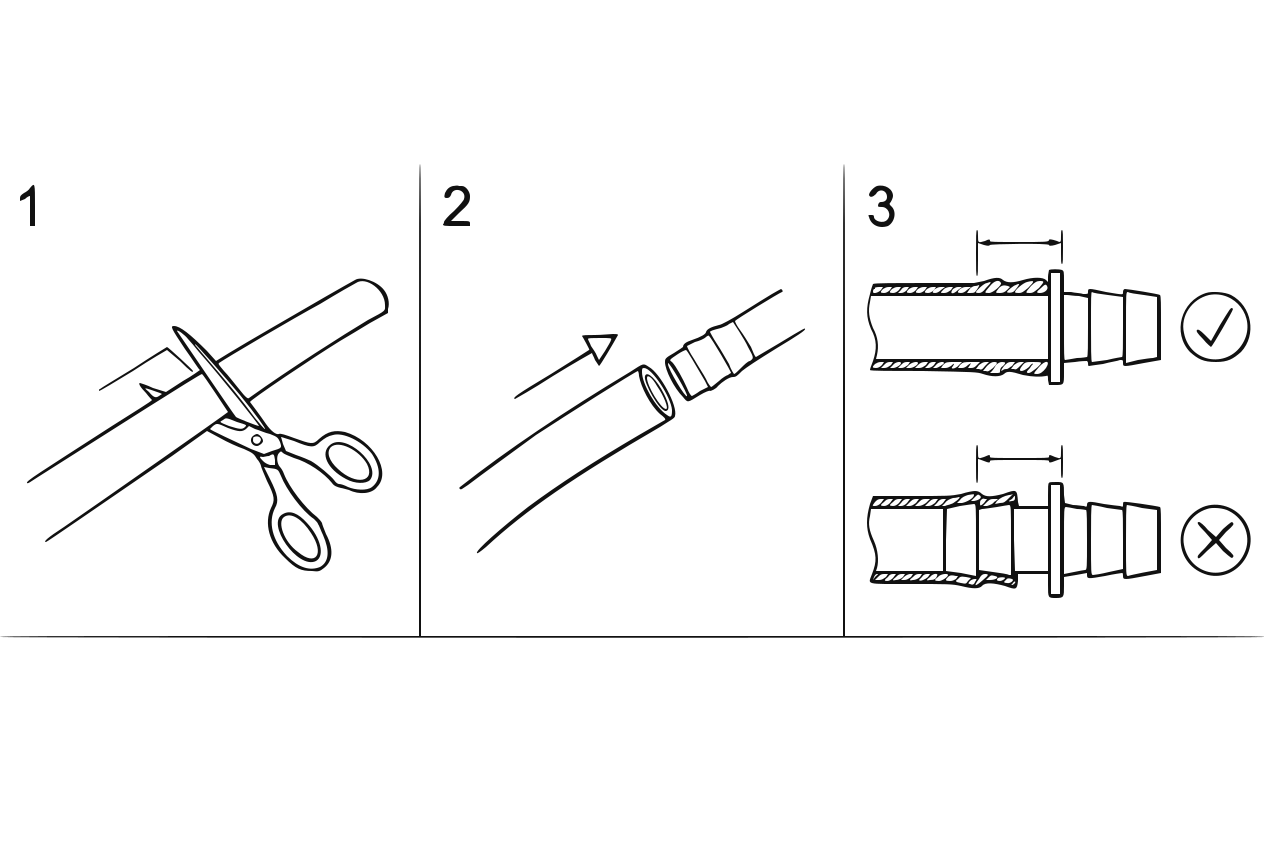
Cut the hose to length and push it on all the way First decide which plant becomes which zone — four are possible. Then measure, for each zone, the distance from the device to the plant and cut the hose to that length with scissors, plus a little extra.
Then apply the zone stickers: one number at the plant end, the same one at the device end of hose and cable. Otherwise you will not know later which hose belongs to which zone.
Caution
Fix the length now and do not change it later: the flow rate depends on hose length, and the step "Calibrate the pumps" measures exactly that setup. If you shorten or extend a hose afterwards, you should recalibrate the zone — it is not required, the amounts just become more accurate again.
7Connect the distributor, insert the sensor, bundle the line
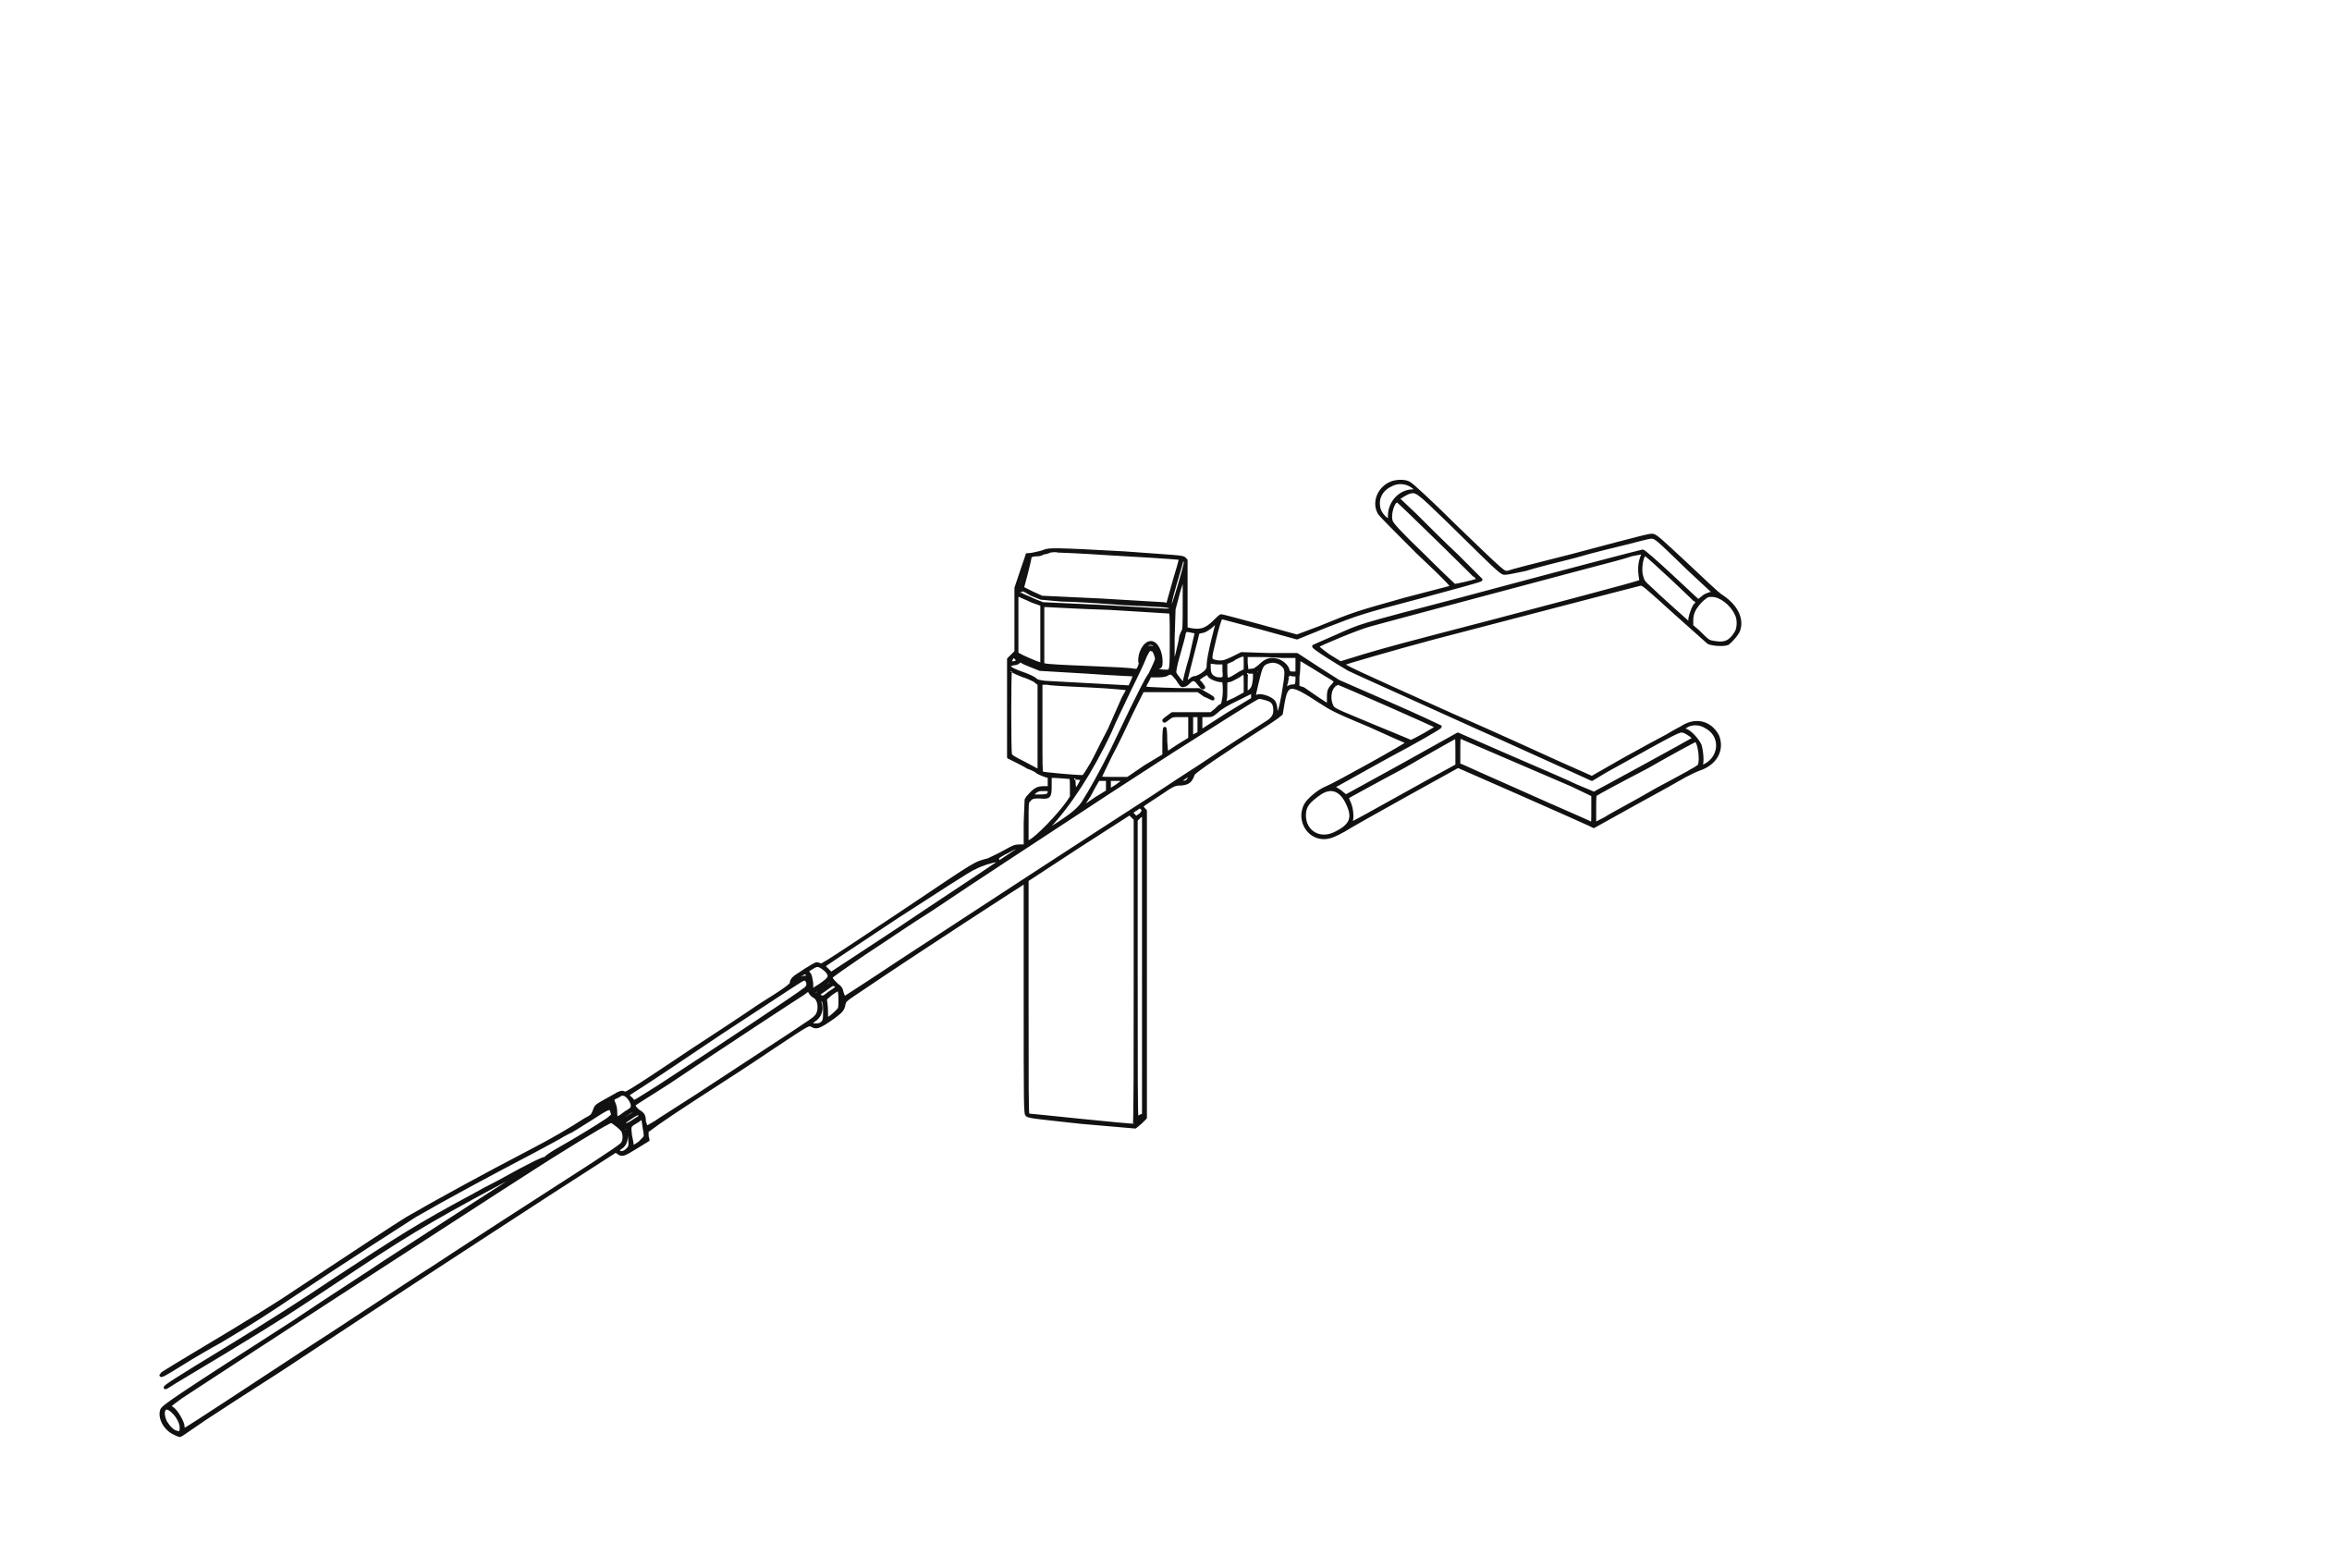
Distributor pushed on, hose and sensor cable bundled with clips Now build one finished unit per zone:
- Push the plant end of the hose onto the connector of the water distributor (or of the Y-splitter or drip hose) — it is push-fit only, there is nothing to screw.
- For a water distributor, push the sensor in from above, lay the cable forward to the cable opening and clip on the lid — the cable comes out through the opening in the lid.
- Bundle hose and sensor cable with the clips, one about every 50 cm. That does more than keep the line tidy: if someone pulls on the hose later, the load hangs on the clips and not on the sensor cable — the point where the cable joins the sensor is the most delicate spot of the setup.
For several plants or a bed, see the guides "Several identical plants" and "A whole bed".
Caution
Distributor and sensor stay above ground for now! For pump calibration the distributor end first goes into a measuring cup — it goes into the soil only afterwards.
See also: Several identical plants · A whole bed
8Connect hoses and sensors to the device
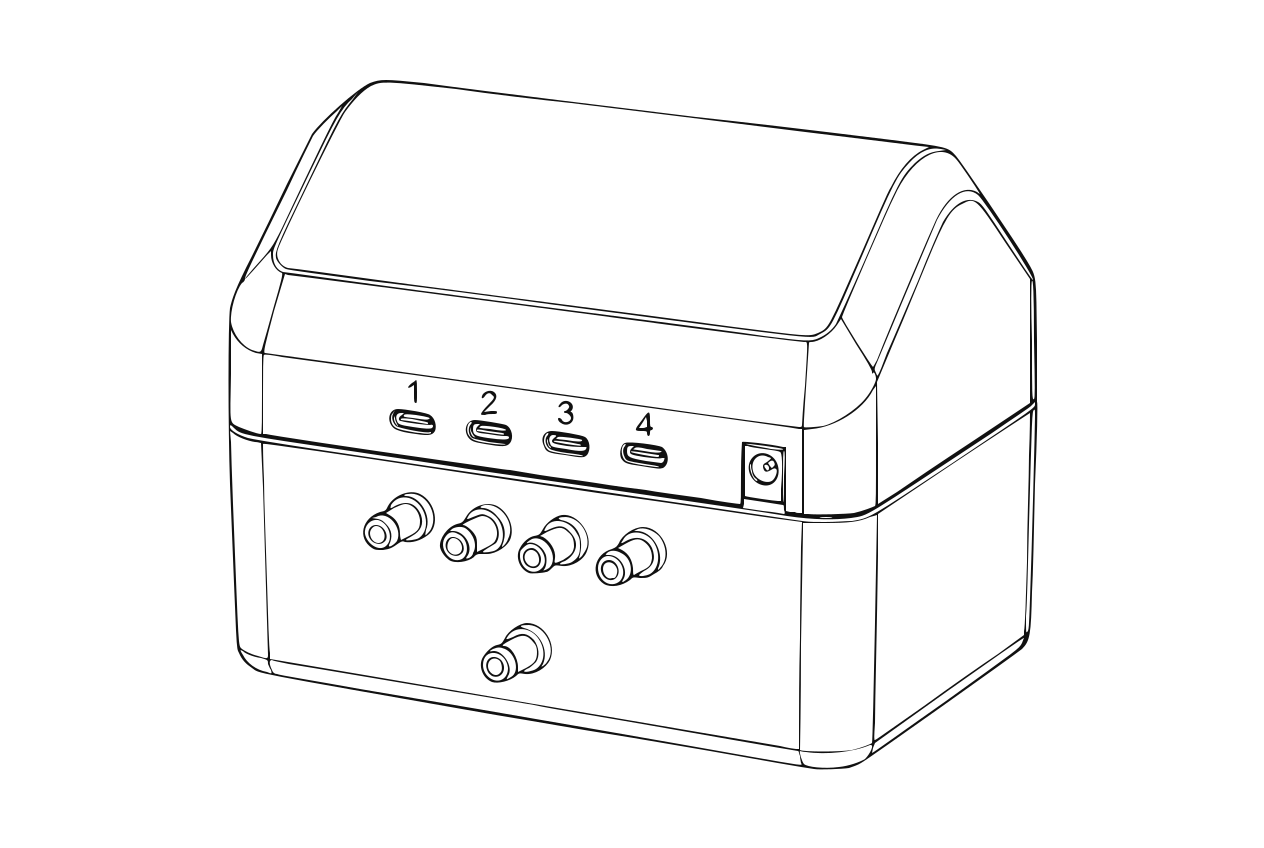
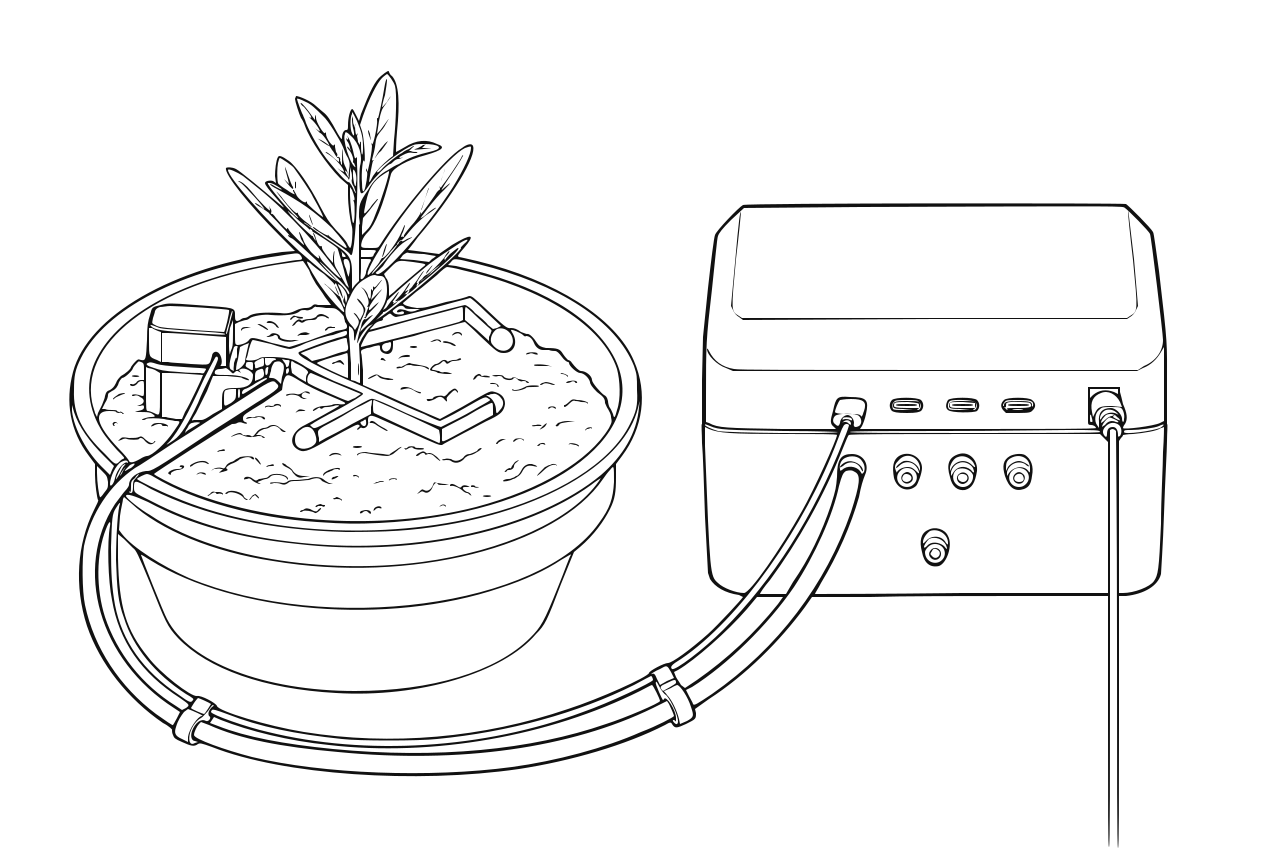
Rear: suction inlet, four numbered water outlets, four sensor sockets Per zone: push the hose onto the water outlet with the matching number. On the back the connectors are simply labeled 1, 2, 3 and 4; each number has one water outlet and one sensor socket. The sensor cable has a USB-C plug — push it straight in until it clicks into place. All that matters is that the hose and the sensor of the same zone have the same number.
Tip
Everything works without tools: the hose is pushed on, the sensor is plugged in. Neither needs force — if something jams, it is not sitting straight.
9Connect the power supply
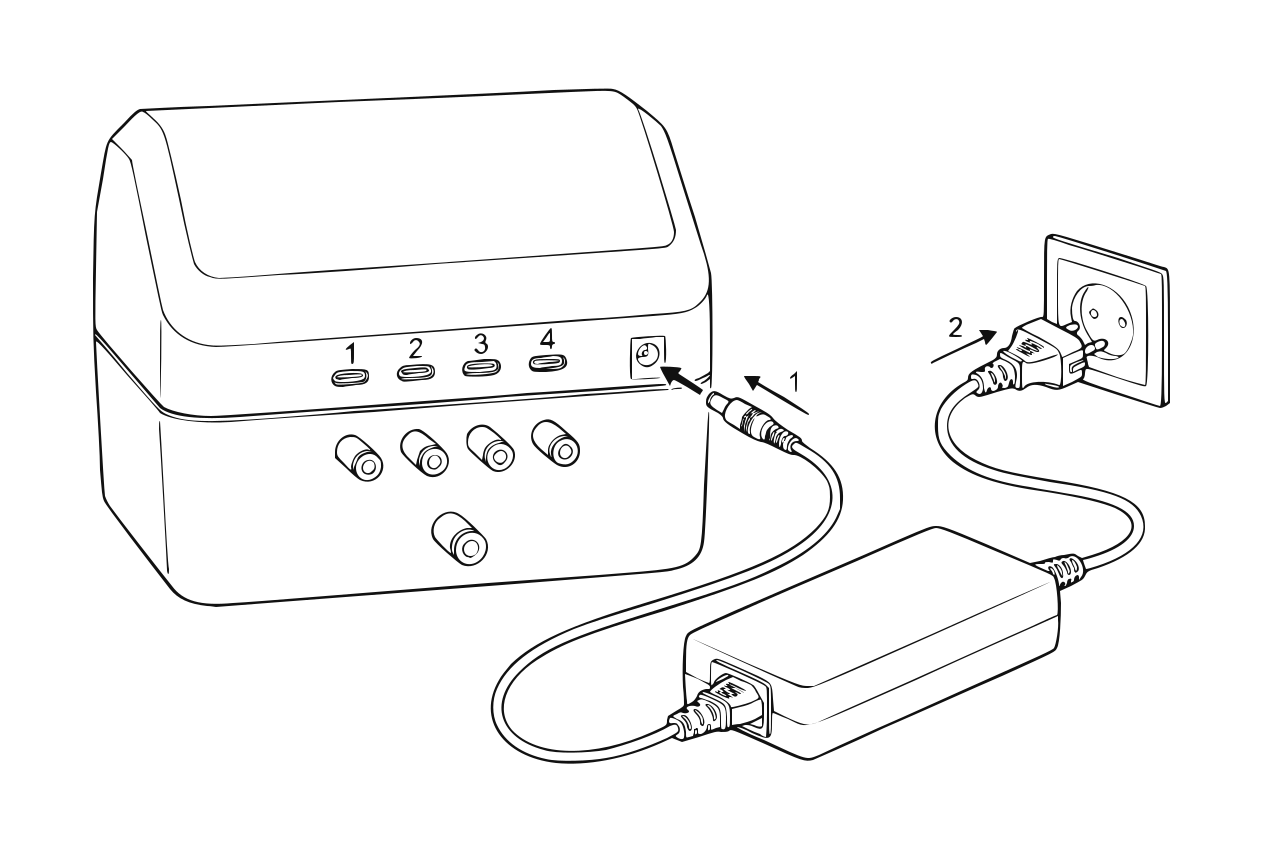
Barrel plug at the rear, power supply into the outlet Plug the barrel plug of the power supply into the back of the device, then plug the power supply into the outlet. After a few seconds the display boots up.
Tip
Power up only now, not earlier: that way the wizard starts once hoses and sensors are already attached, and you can try out every zone straight away.
10Check the back of the device
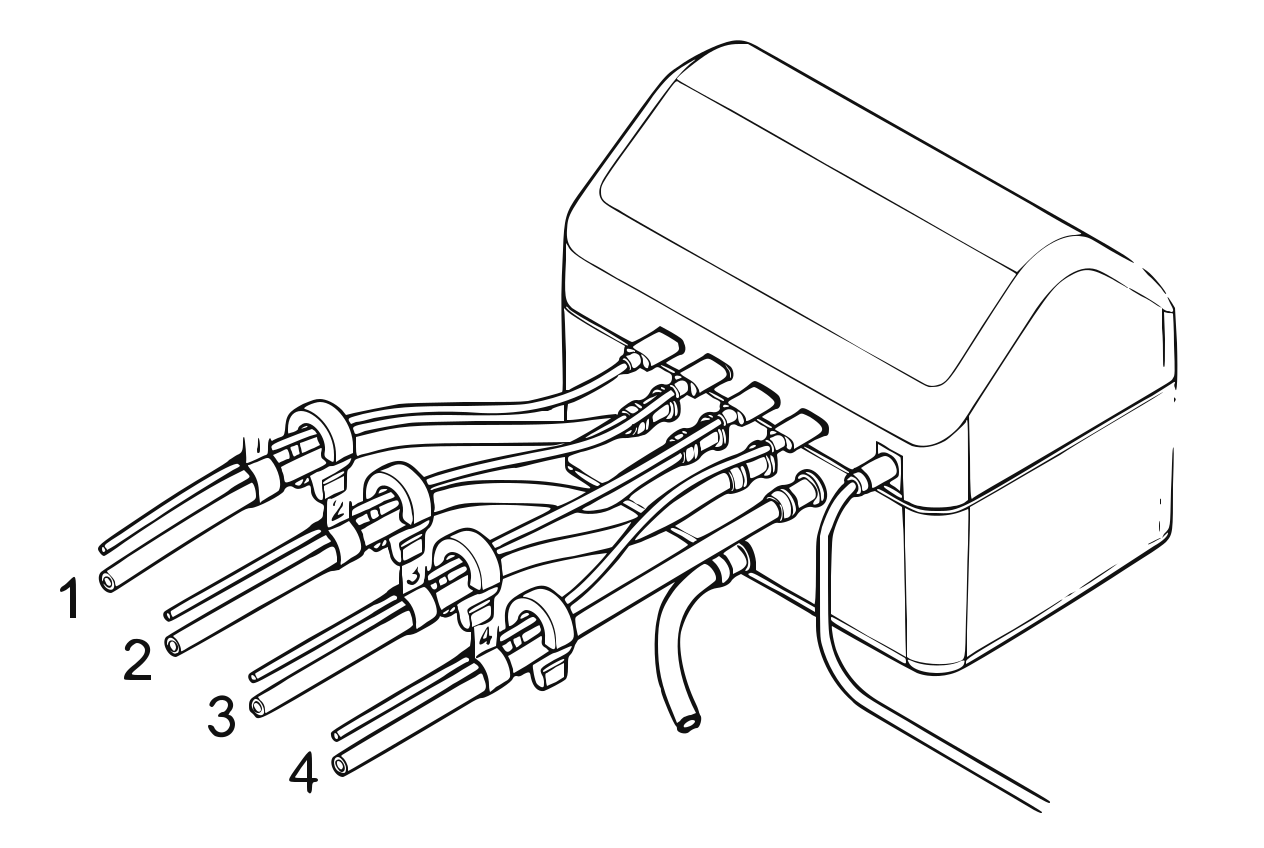
Everything connected: hose and sensor cable of each zone on the same number This is how the back looks with everything connected: the hose and the sensor cable of each zone sit on the same number, the suction hose on the suction inlet, the barrel plug of the power supply in its socket. A quick look now pays off — otherwise a swapped zone only shows up in the test run.
11The setup wizard starts
The setup wizard asks for this step by itself.
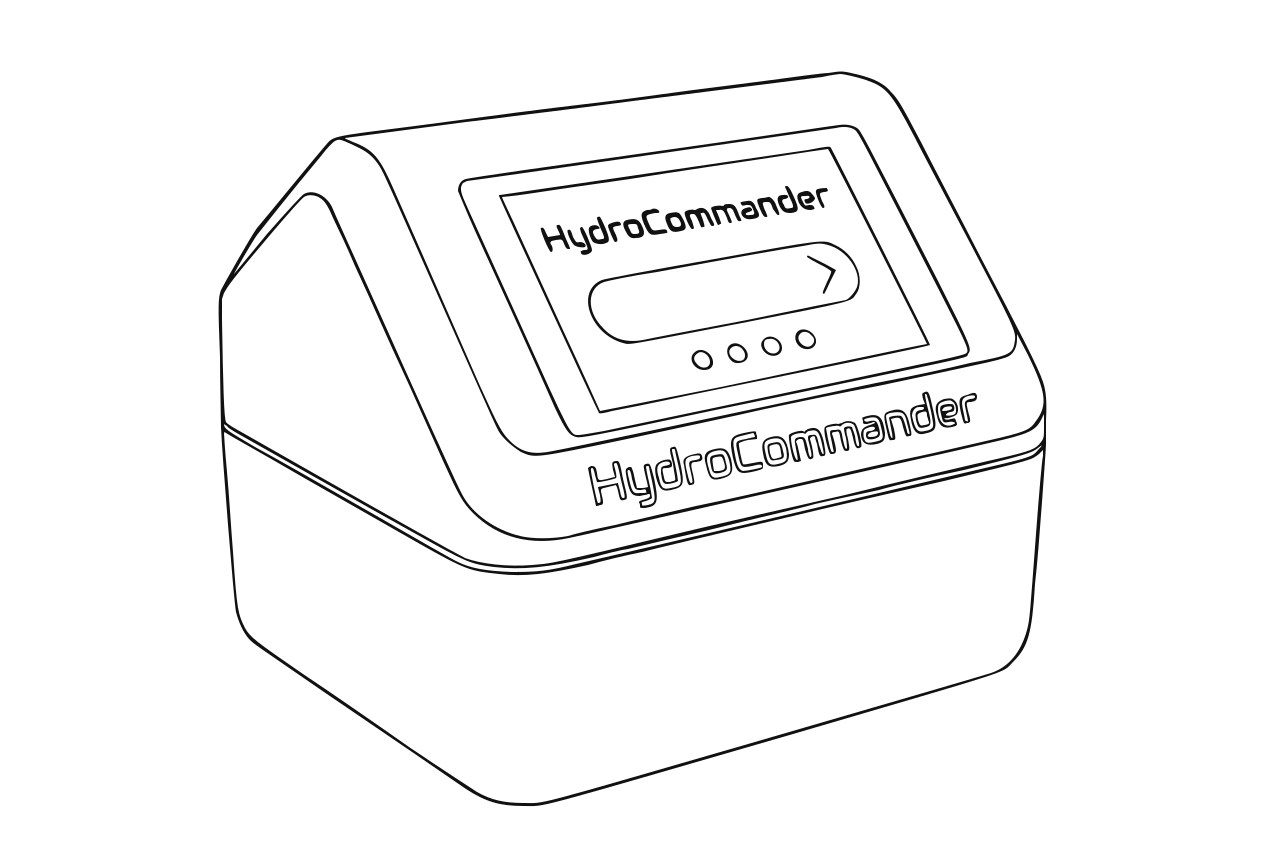
Start screen of the setup wizard The wizard first asks for the language. Then it offers three options:
- Set up on device — everything on the touchscreen.
- Set up with phone — Wi-Fi on the device first, then the app takes over ("Connect the app").
- Skip — set up later.
WHAT THE WIZARD ASKS — the order depends on the path you choose:
ON THE DEVICE:
- Set up zones — type, watering mode, plant and name for each zone
- Tank size — or "I have no tank"
- Wi-Fi
- Measure flow rate — guides you through all four zones
- Distributors and sensors into the soil, then the sensor check
- Test run — run each zone briefly
- Activate zones
WITH A PHONE:
- Wi-Fi on the device
- Scan the QR code, the app takes over
- Zones, tank size, flow rate, distributors and sensors, test run and activating the zones — as above, just in the app
FROM HERE ON, THIS GUIDE follows the phone path, because most people take it. Steps the wizard asks for by itself are marked accordingly. Work through it and you are done — you only need to look things up here if something stays unclear.
12Connect to Wi-Fi
The setup wizard asks for this step by itself.
In the Wi-Fi step: tap "Search networks", then "Search" — the device does not search on its own. Pick your network from the list (or enter its name manually), type the password, connect. The device then shows its IP address.
Tip
Wi-Fi is optional — HydroCommander waters perfectly fine without any network; you only lose the app, weather data and automatic time sync. Add Wi-Fi later under Settings → Wi-Fi; set the time manually under Settings → "System settings" → "Date/Time".
Caution
HydroCommander only transmits on 2.4 GHz. On routers with separate networks, choose the 2.4 GHz one — a 5 GHz-only network cannot be joined even by entering it by hand.
Some routers do not show up in the search even though they transmit on 2.4 GHz — for example with a hidden SSID, or when both bands share the same name. In that case type in the network name (the SSID) by hand via "SSID manual"; it must match exactly, including upper and lower case.
13Connect the app — easiest via QR code
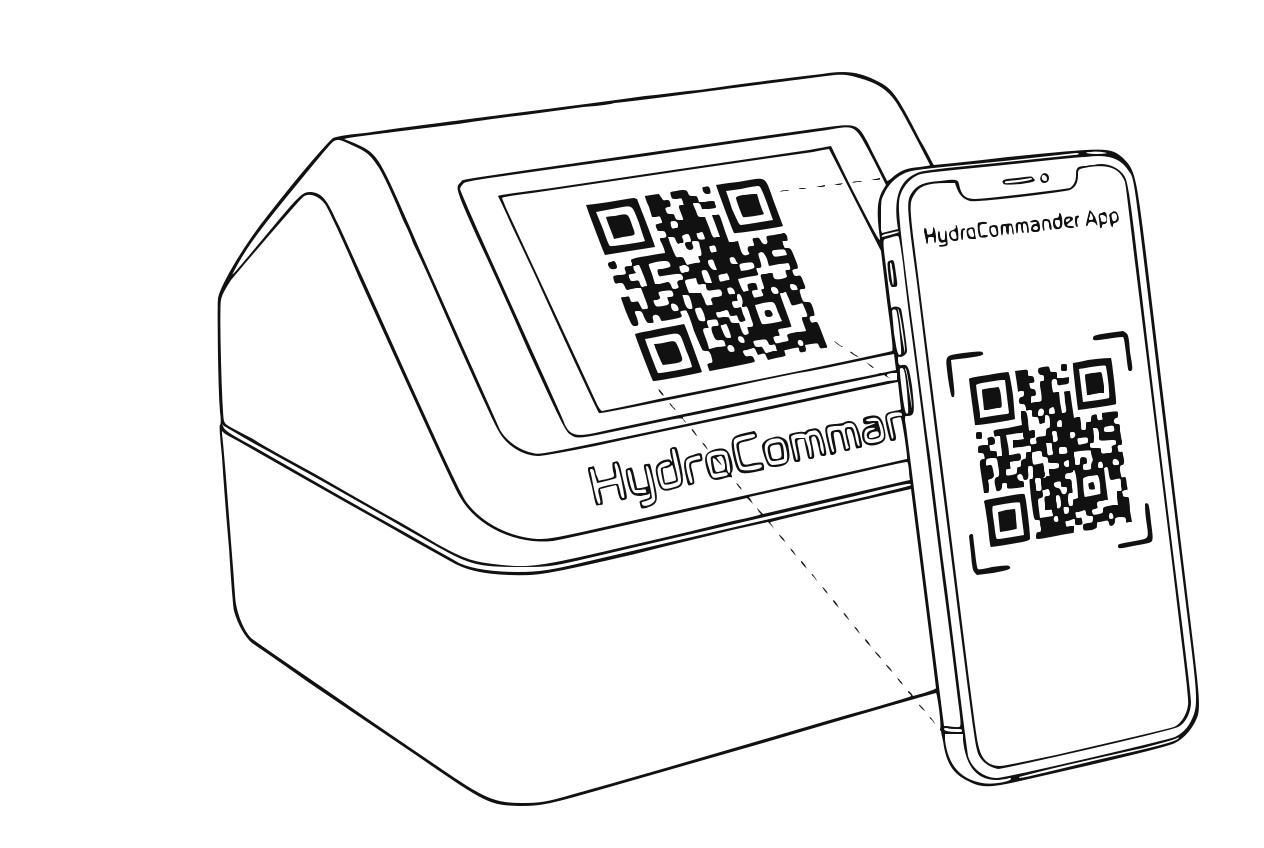
QR code on the device, scanned with the app Install the HydroCommander app and follow its setup wizard. Fastest way: on the device open Settings → "QR / API token" and scan the QR code with the app — the connection is configured automatically.
Alternatively the app can find the device via network scan; then enter the access token shown on the display once (same screen as the QR code).
Tip
Phone and HydroCommander must be on the same Wi-Fi for this. If you chose "Set up with phone" in the wizard, the device shows the QR code automatically.
14Set up your zones
The setup wizard asks for this step by itself.
The wizard walks you through each zone one at a time. Four questions per zone; with AI watering of a single plant the pot size is added:
- WHAT IS CONNECTED TO THIS ZONE?
- Single plant — one pot, one water distributor. The standard case.
- Several single plants — a row or group, fed via Y-splitters. Only one of them is measured; all of them are watered the same.
- Bed — an area with a drip hose instead of individual distributors.
- Disable zone — nothing connected. Can be activated at any time later.
- HOW SHOULD IT BE WATERED?
- Automatic — waters in short bursts as soon as the soil drops below the target. You set pump duration and pause yourself. Simple and predictable.
- AI watering — learns how quickly your soil dries out and how strongly it responds to water, and waters proactively. It needs a few days to learn.
- Schedule — fixed times and weekdays. The sensor does not decide when to water, but it can skip a scheduled watering if the soil is moist enough.
Exactly one mode is active per zone at any time.
- WHICH PLANT?
A preset sets target moisture, tolerance and the daily amount to sensible starting values. You can also enter your own values instead — the preset is a shortcut, not a must.
- WHAT SHOULD IT BE CALLED?
A name makes the zone recognizable in the app and in the log. "Balcony tomatoes" will help you more later than "Zone 1".
Tip
Don't worry about getting values wrong: everything can be changed at any time — see the guide "Configure a zone".
See also: Configure a zone
15Calibrate the pumps
The setup wizard asks for this step by itself.
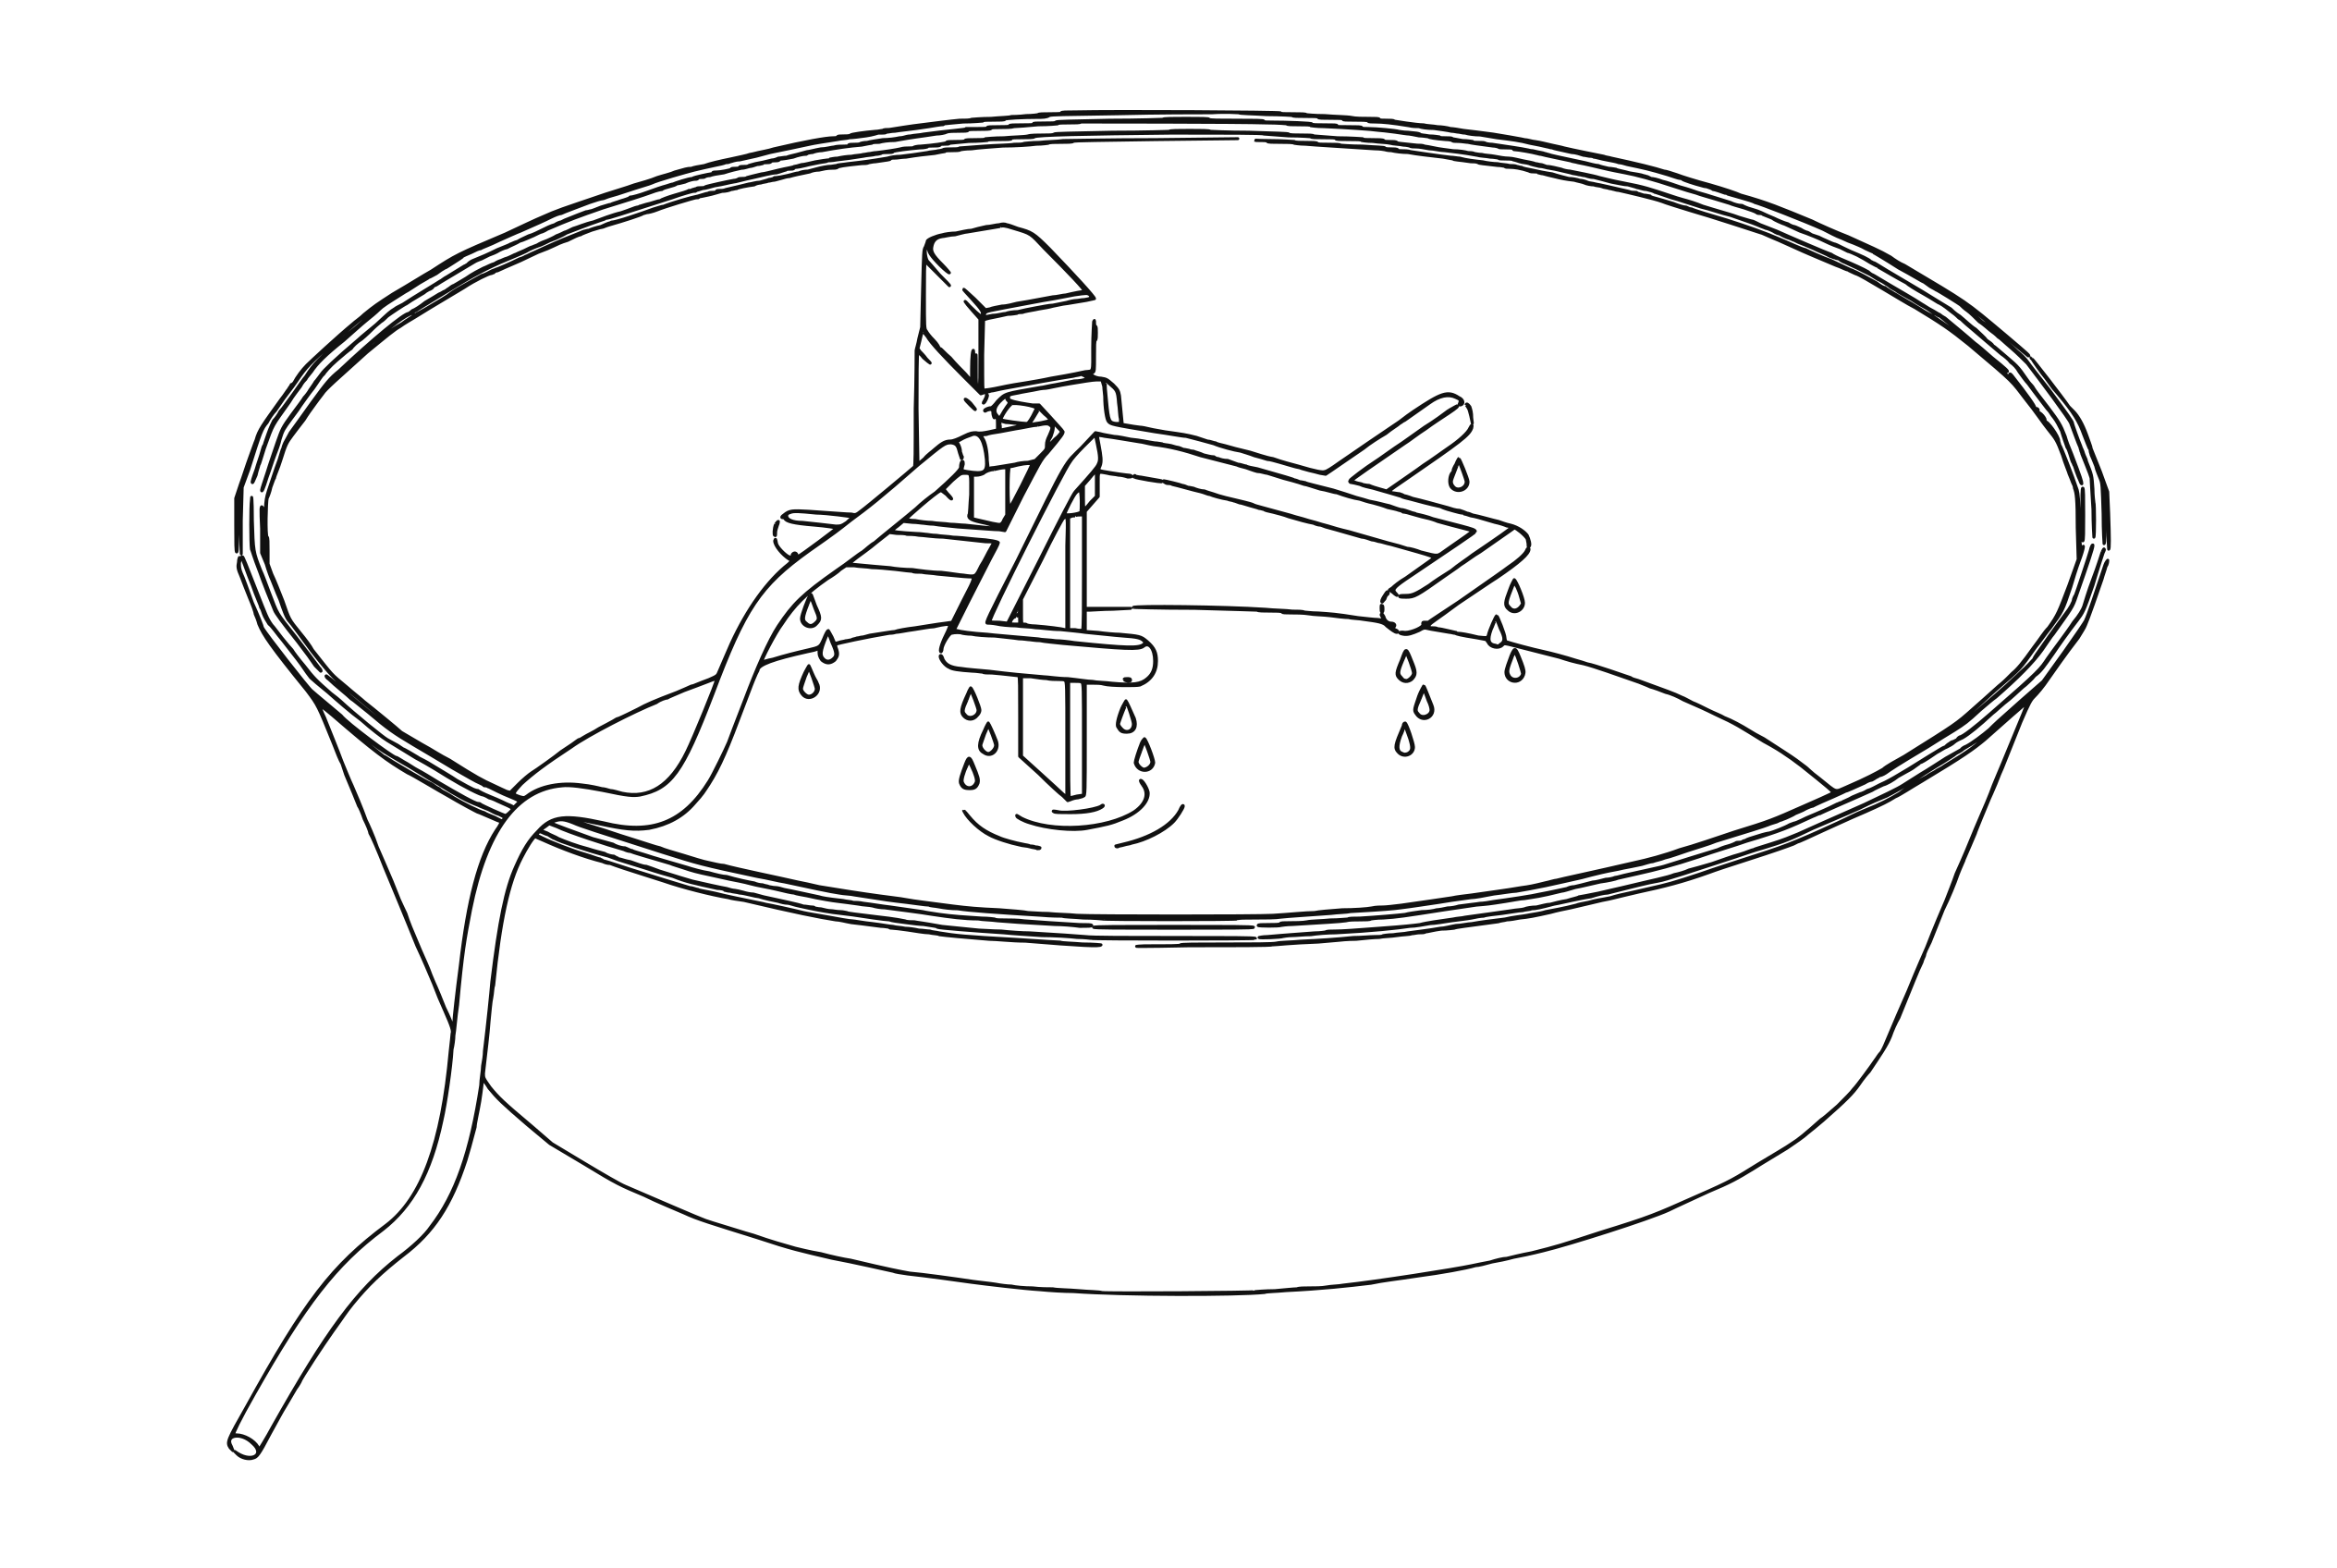
Measuring setup: distributor in the collecting basin, suction hose at the bottom of the tank Your sensors come factory-calibrated — nothing to do there. You calibrate the pumps once yourself, because the actual flow rate depends on hose length and heights. Only then are all ml figures right (watering amounts, statistics, tank forecast).
PREPARE: Place the water distributor in a collecting basin — leave it connected, otherwise the nozzle pressure is missing and the amount comes out too high. A measuring cup is usually too small for this: let the water run into the basin first, then pour it into the measuring cup and read it off. The same goes for a drip hose.
In the app
Settings → Pumps → expand the "Pump settings" section → under "Flow rate" tap "Calibrate flow rate" → pick a zone. There is a shorter way straight from the zone: open the zone → "Calibrate".
After saving, the app asks whether the value should apply to further zones. That only makes sense if those zones are built the same way.
On the device
Settings → Pump settings → "Calibrate flow rate" → pick a zone. The pump runs for 20 seconds, then enter the amount you measured.
After saving, the device also asks whether the value should apply to other zones.
Tip
Extended a hose later or moved a plant? Then a new calibration is recommended — it is not required, the values just become more accurate again. After changing the pump power, however, it is required.
See also: Calibrate pump
16Insert distributor and sensor into the soil
The setup wizard asks for this step by itself.
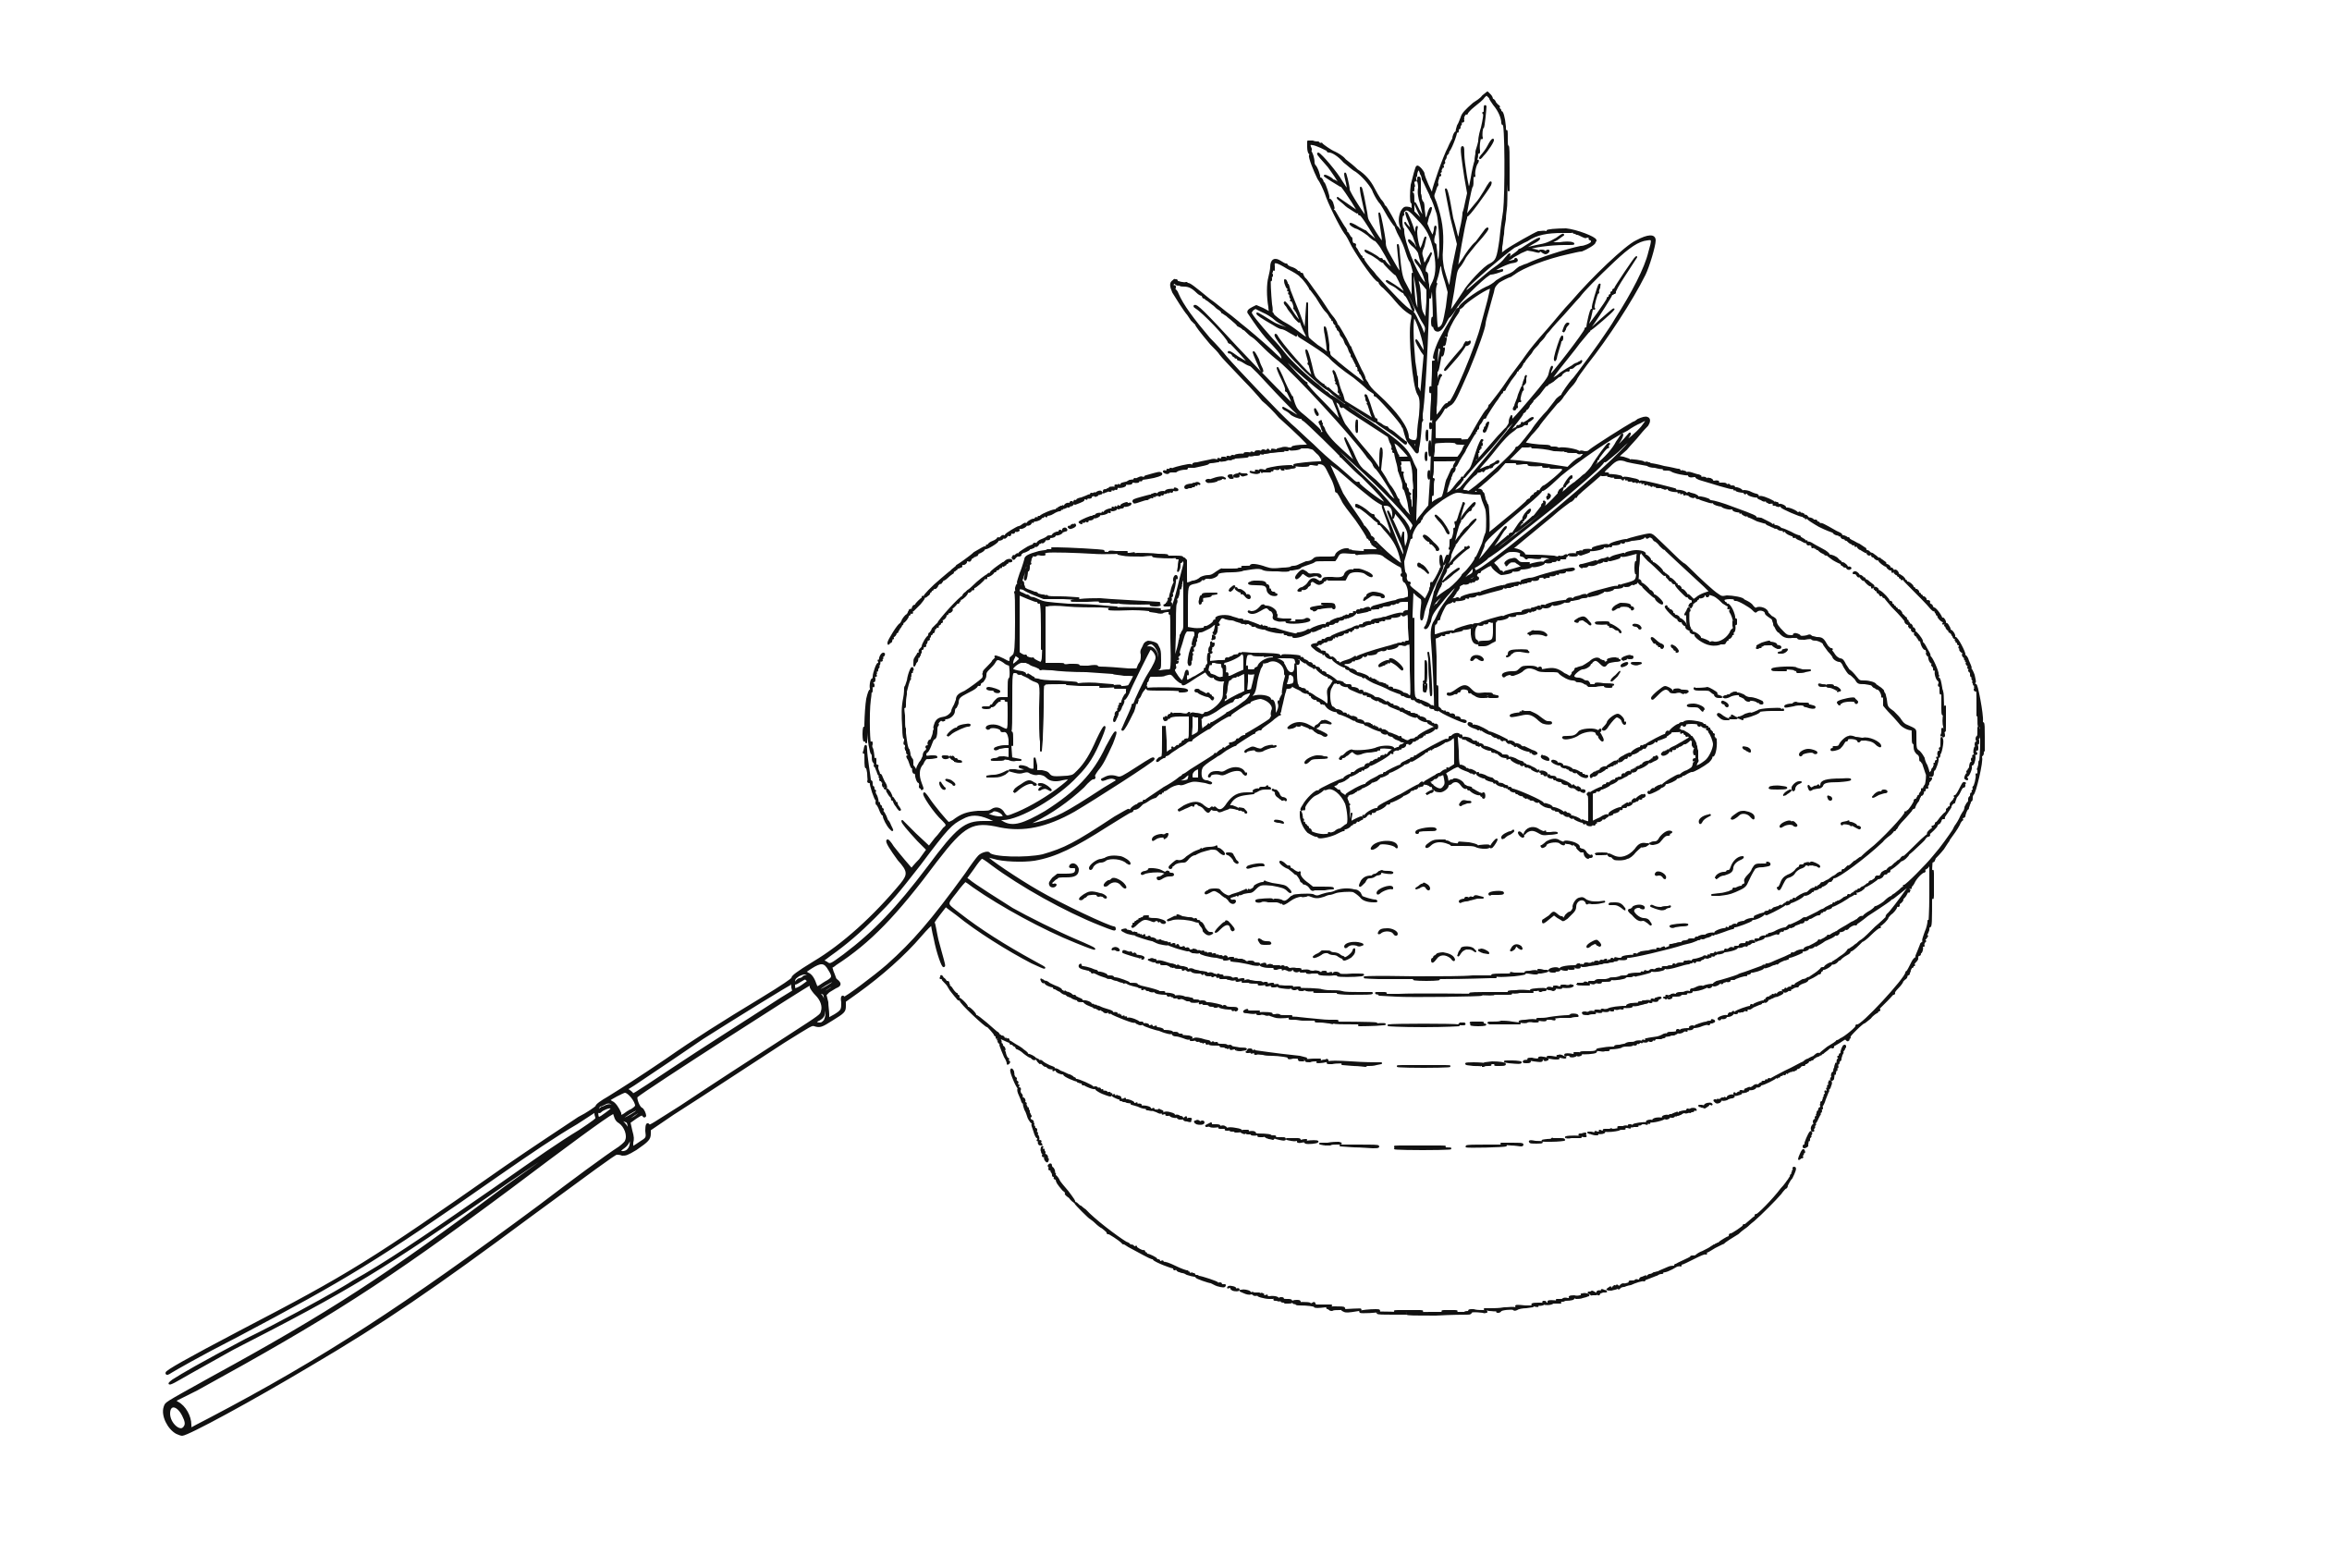
Distributor ringed around the stem, sensor anchoring it alongside Insert the water distributor into the soil so that its arm loosely wraps around the stem — the openings spread the water evenly around the plant. The sensor is firmly attached to the distributor and is pushed into the soil along with it. It has two jobs: it measures, and it holds — its foot anchors the distributor in the soil so the hose cannot pull it out of position. As a side effect it sits slightly closer to the rim of the pot than to the middle, which is exactly right for the measurement.
For drip hose (bed) and Y-splitter: see "A whole bed" and "Several identical plants" for routing.
Tip
SUBSTRATE: The sensor measures an electrical property of the soil. How a given water content translates into percent therefore depends on the substrate — loose mixes such as coco, or a high share of perlite, give different readings at the same wetness than dense potting soil. The plant preset defaults are tuned for ordinary potting soil. If your plant sits in something else and a zone feels persistently too dry or too wet, adjust the target moisture in steps of a few percentage points until it fits.
See also: Several identical plants · A whole bed
17Test run: does water arrive?
The setup wizard asks for this step by itself.
Test run: water comes out at the distributor The wizard brings you here by itself: after the sensor check comes the test run, with one button per zone. Each one runs for five seconds. If water visibly comes out at the distributor, everything is connected correctly.
The zones are NOT active yet at this point — only what you tap runs. That way a swapped or not fully seated hose shows up before the system works unattended.
To test again later: open the zone → "Water now (5s)" (on the device "Manual pump (5s)").
18Done — your system is running
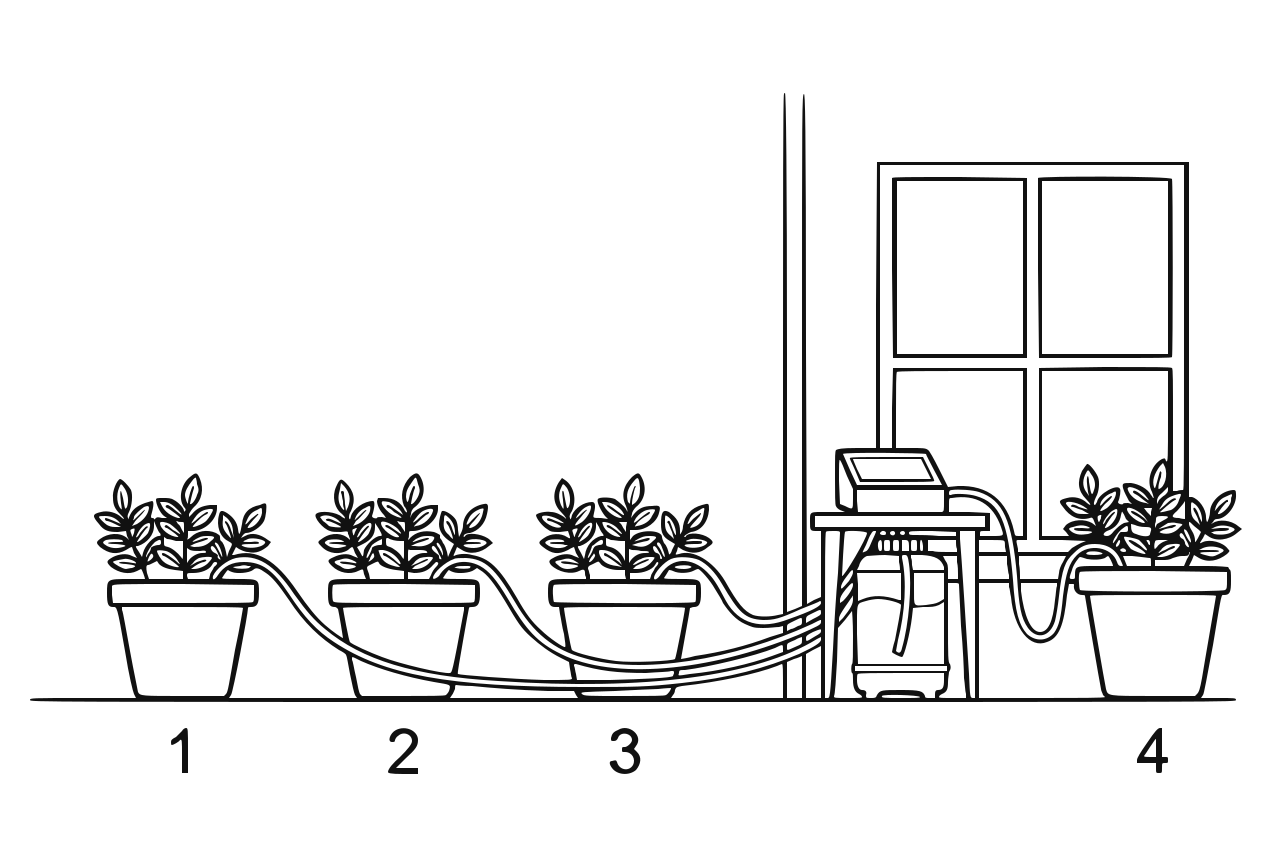
The finished system at a glance If you did not start your zones in the wizard yet: open the zone → in the app switch on "Zone active", on the device tap "Enable zone". From now on your HydroCommander takes over the watering.
Caution
Fresh soil needs to settle — moisture readings can fluctuate during the first 2–3 days. Fine-tune targets only after that.
See also: Configure a zone · AI mode · Sensor error (NIO) · Remote access (cloud) · Weather control
Done — your HydroCommander is running! Good next reads:
- "Configure a zone" — understand and fine-tune target moisture and tolerance
- "AI mode" — the self-learning watering
- "Weather control" — auto-pause outdoor zones on rain
- "Remote access (cloud)" — check in from anywhere (optional, off by default)
And if something is off: "Sensor error (NIO)" and the FAQ will help.